00: Introduction
In this tutorial we’ll walk through the process of building a SpiNNaker application using the Rig library. This series of tutorials builds up from ‘hello world’ to eventually building full-blown digital circuit simulator.
In part 01 we build a simple hello world application demonstrating how Rig can be used to load and run programs on SpiNNaker.
In parts 02 and 03 we get the hang of reading and writing data into SpiNNaker.
In part 04 we use what we have learned to build a proof-of-concept circuit simulator. This implementation can only simulate one circuit and uses hand-written routing tables and manually assigns work to SpiNNaker’s processors.
In part 05 we rewrite our circuit simulator as if it were a real application. We design a simple API for describing circuits and use Rig’s automatic place and route facilities to automatically map our circuit simulations onto the SpiNNaker machine.
The digital circuit simulator we’ll be building in this tutorial closely follows the program structure used in real-world SpiNNaker applications. Though only a very small program (under 400 lines of heavily annotated Python) our simulator goes through almost all of the steps real neural simulation applications do, including implementing a high-level domain-specific ‘language’ for describing simulations. With luck, after completing these tutorials you will have an understanding of how to go about building your own SpiNNaker applications.
Before getting stuck in, we’ll take a look at how a typical SpiNNaker application is structured and highlight how Rig fits into this picture.
SpiNNaker applications and Rig
Though SpiNNaker is usually described as a ‘computer’, in practice most applications would be more accurately described as using SpiNNaker as a co-processor or an accelerator. As a result, most applications are written in two parts:
- SpiNNaker application kernels
- A collection of small C (or C++) programs which run on SpiNNaker’s application cores. These programs do the ‘real’ work in most applications, for example simulating neural behaviour, recording results, or playing back artificial stimuli.
- Host application
- A program which runs on a host computer connected to your SpiNNaker machine, commonly written in Python. This program handles the conversion of high-level user input into raw data the SpiNNaker application kernels can process, loads software and data onto the SpiNNaker machine and retrieves and processes results.
Though the SpiNNaker application kernel is responsible for most of the actual computation, the host program is often more complex. Rig is a library which helps with the process of writing host applications by providing tools and functions which simplify the task of interacting with and programming a SpiNNaker machine.
In this tutorial we’ll be building an application which follows the program structure used by the host programs of many existing neural simulation tools (e.g. Nengo SpiNNaker and PyNN SpiNNaker). This program structure is illustrated in the figure below:
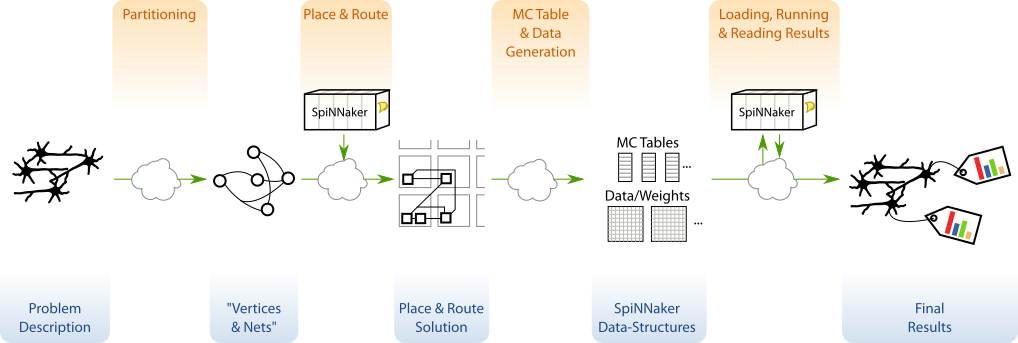
Most SpiNNaker applications provide a domain-specific API for describing whatever is to be simulated. This description is then partitioned into a graph of SpiNNaker-core-sized (vertices) which communicate with each other (via nets). This first step is usually very application specific and so Rig does not provide any functions to help.
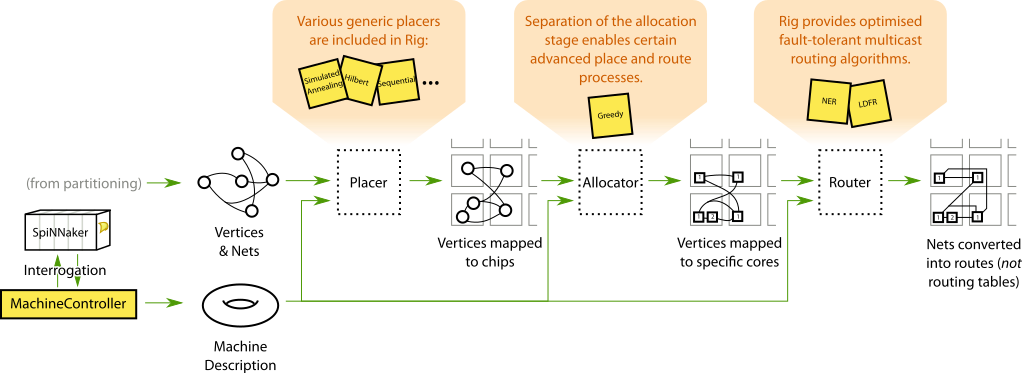
In the place and route phase of application execution, the graph of vertices
and nets is mapped onto specific cores and routes in SpiNNaker’s network. Rig
provides a number of utilities and algorithms for performing place and route
tasks for SpiNNaker applications in the rig.place_and_route module.
The figure below illustrates how Rig breaks place and route into three stages:
placement, allocation and routing. In most applications this process can be
handled automatically by a simple wrapper function but more advanced
applications can customise the process.
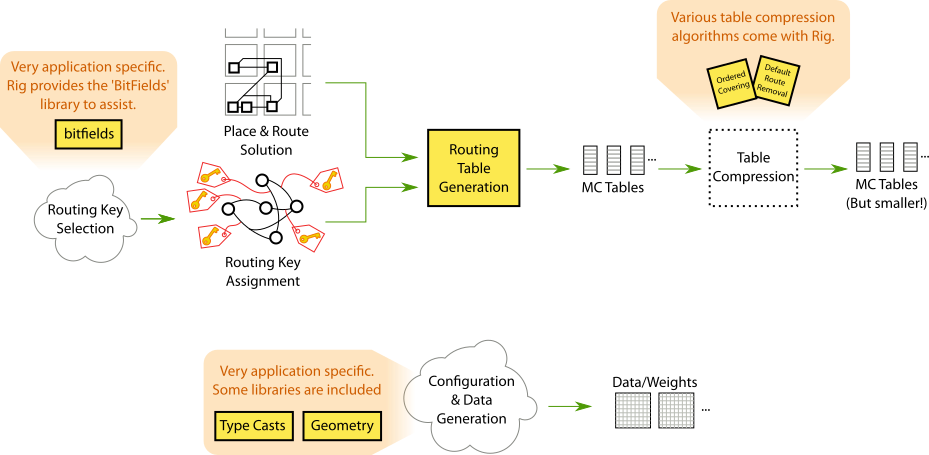
In the next phase of execution a typical application generates configuration
data and routing tables which will be used by SpiNNaker application kernels
(illustrated below). Though generating configuration data is highly application
specific, Rig provides a limited set of libraries such as
rig.type_casts for converting between floating and fixed point
numbers, and rig.geometry for dealing with machine geometry. Rig also
provides libraries to assist in selecting routing keys (rig.bitfield) and generating and compressing SpiNNaker routing
tables (rig.routing_table).
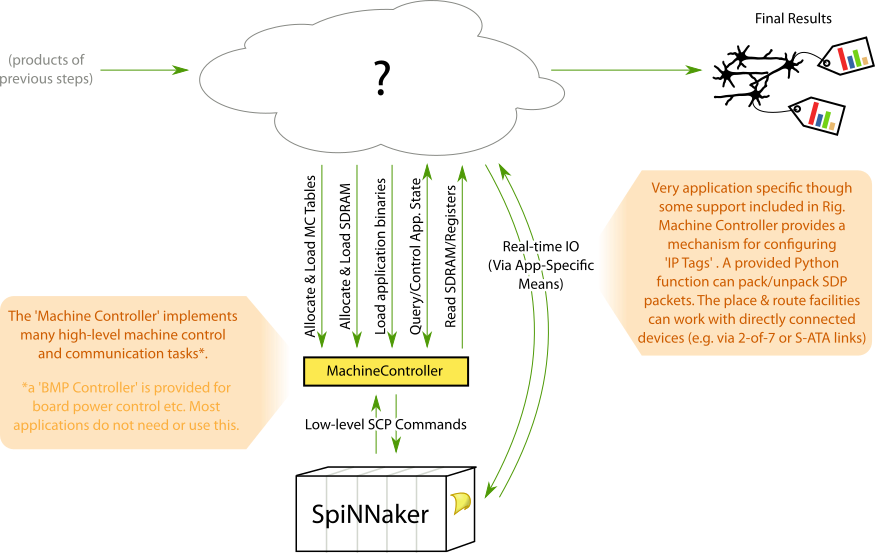
In the final stage of execution (illustrated below), the SpiNNaker application
kernels are loaded onto the SpiNNaker machine along with the generated
configuration data and routing tables. Results are retrieved when
computation completes. Rig provides a
MachineController class which provides an
efficient and high-level interface for controlling and interacting with a
SpiNNaker machine. Development of custom, real-time interaction with running
SpiNNaker application kernels is also supported but remains a largely
application specific task.
Note
It is important to note that the Rig library does not assume or rely on this particular program structure. Rig can be (and is) used in numerous applications with widly different structures. Examples include interactive use in the Python interpreter, cabling validation software and site-wide SpiNNaker job management and machine sharing.
You will need…
Before you start this tutorial assumes you have the following set-up and working:
- An ARM cross-compiler. In this tutorial we presume GCC which can be downloaded and installed from Launchpad or from the package managers of good Linux distributions.
- The latest version of the ‘spinnaker_tools’ low-level software package which can be downloaded from the SpiNNaker web pages.
- A SpiNNaker machine. Any size from a 4-chip SpiNN-2 or SpiNN-3 board upwards will do. To make sure everything is working correctly, make sure you can get the example ‘hello’ app supplied with ‘spinnaker_tools’ to compile and run (see the ‘spinnaker_tools’ README).
- A working Python 2 or Python 3 environment with Rig installed.
Without further delay, proceed to part 01.